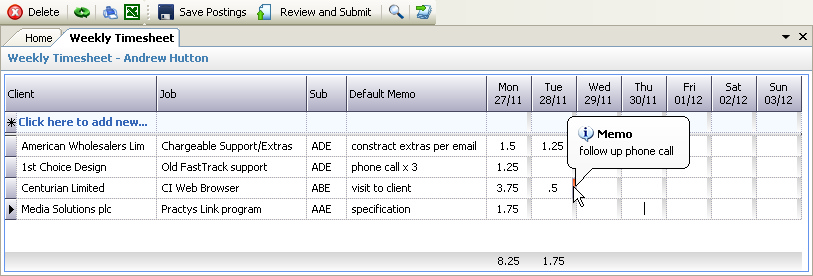

The above program is loaded when the Weekly Timesheets link is clicked from the Postings navigation pane. The exact columns that appear will depend on the System Configuration. For example, the above example shows the columns applicable to the Commercial costing type with default subsidiary codes and no work types.
Please refer to the Posting Grids for instructions on how to enter data into the Posting grids.
The Weekly Timesheets postings grid has the following additional features not available in the other posting grids:
•Multiple time entries per row - up to seven different time entries (one for each day of the week) can be entered for a particular job / client. Once posted all non blank cells will appear as individual entries on any detailed views or reports for the respective client / job.
•Memos per cell - where multiple time entries are posted on a single row, the description entered in the 'Default Memo' column will appear against each posting. The memo can be altered for individual cells by clicking on the grey strip at the right hand side of each cell - an input box will appear allowing a new memo to be entered. Once entered the grey strip will appear red and the memo can be viewed by hovering the mouse over the strip (see example above).
• Populate Timesheets - this would normally be done after a weeks time has been submitted and the user is presented with a new blank grid for the next weeks postings. Clicking on the Populate Timesheet icon will invoke the Forms Assistant allowing the user to load clients / jobs either from their 'My Jobs' listing or automatically load clients / jobs where they have posted time for the past 1,2, 3 weeks or 1 month
•Minimum Hours - the total hours for the week will be verified against the minimum specified in the System Configuration and / or specified in the Employee Details. NOTE - this verification takes place when the timesheet is submitted - see below.
Once all data has been entered for the week, or indeed if a review is required (maybe for print purposes), the 'Review and Submit' button should be clicked which will group each posting row by client / job, allow a printout of the time to be taken, and allow manager's authorisation, before finally submitting the postings - see Review And Submit.
After submission, the week will have been advanced and a blank grid will be displayed ready for the next week's time to be entered. See also the Populate Timesheet option above.
