
The above program is loaded when the Prospective Clients link is clicked from the Clients navigation pane.
Please refer to the Grid Views for how to use the Prospective Clients grid view. In addition to the standard features described in the link, the following options are available:
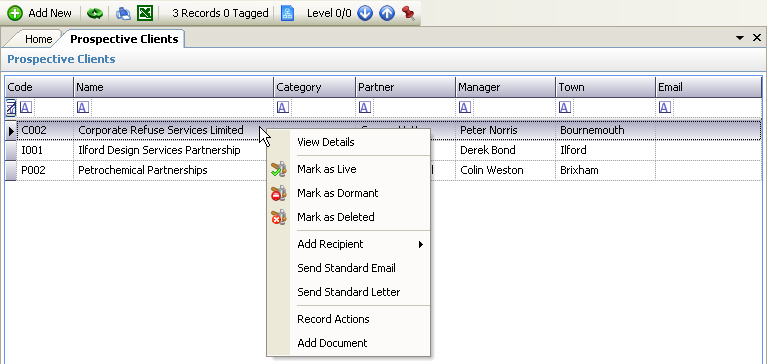
•Add New - this can be chosen from the Toolbar and will display a blank Client Details page ready for the data to be entered for a new client. NOTE - Clients must first be created as live and then have their status changed to Prospective to appear on this view.
•View Details - this can be chosen by double clicking the mouse on a row, or by right clicking the mouse over a selected row and choosing View Details, and will display the Client Details for the selected client.
•Mark as Dormant (Professional version only) - this can be chosen by right clicking the mouse over a selected row and will allow the selected client to marked as Dormant. NOTE - Clients are never physically deleted from the database as their costs may be required for a substantial period of time after they become dormant. They may be re-instated from the Dormant Clients view.
•Mark as Deleted (Professional version only) - this can be chosen by right clicking the mouse over a selected row and will allow the selected client to marked as Deleted. NOTE - Clients are never physically deleted from the database as their costs may be required for a substantial period of time after they become deleted. They may be re-activated from the Deleted Clients view.
•Add Recipient - this can be chosen by right clicking the mouse over a selected row and will add the client (subject to a valid email address) to be added to an email as either To, Cc or Bcc - see Email Editor. If the Email Editor is closed, a new Email will be created with the client's email address, otherwise the client's email address will be added to the list of recipients.
•Send Standard Email - this can be chosen by right clicking the mouse over a selected row and will display the Standard Document dialog box for selection of a client standard email.
•Send Standard Letter - this can be chosen by right clicking the mouse over a selected row and will display the Standard Document dialog box for selection of a client standard letter.
•Record Actions - this can be chosen by right clicking the mouse over a selected row and will display the New Actions dialog box. Actions created will be saved against the client and can be viewed in the Client's Actions tab. They may also appear in the User's To Do list.
•Add Document - this can be chosen by right clicking the mouse over a selected row and will display the New Document dialog box. Documents created will be saved against the client and can be viewed in the Client's Documents tab.
